
 Did you happen to see Heather Ross’ DIY Envelope Liner project on the Etsy blog recently? I was totally inspired to try something similar, but instead of using a premade pattern, I wanted to create my own! I’ll walk you through the steps of using hand carved linoleum stamps to print your own envelope liner, which is sure to impress any pen pal, and could even be used to create personalized stationery or wedding invites!

Materials:
- Text-weight colored paper that compliments your envelope
- Linoleum printing block
- Scissors
- Acid-free glue stick
- Stamp pad
- Carving tools and Xacto knife
- Envelope with a pointed flap (I used 4 bar size envelopes for this project)
*Author’s note: I only recommend products that I love and use in my own studio. I may receive a small commission on sales of the products that are linked to in my posts.

Begin by trimming the blank paper to size. First, unfold the top envelope flap, and measure from the center of the bottom of the envelope to just under the glue on the top of the flap. Then measure the width of the envelope (see Fig. 1). Trim your paper to accommodate this size. Slip the piece of paper into the envelope to test if it will fit (it should look like Fig. 2).

Next, create a stamp that you’d like to use for the pattern inside the envelope. If you’ve never carved a linoleum stamp before, I covered the basics in my gift wrap stamp tutorial. You can sketch out a design on a piece of paper, or just draw an idea directly onto the linoleum block with a soft pencil. Keep in mind that carved areas will not print, and that your design will print as the reverse image of what you carve. Safety tip: always push the carving tools away from your body, and be careful not to keep your hand in front of the knife (you don’t want to knick a finger!)

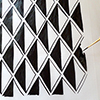
Play around with size and scale, see if you prefer the look of a larger design, or a very small design. You’d be surprised how much a simple polka dot can jazz up a plain envelope. Stamp your design onto the liner paper using the ink pad, either in a uniform pattern, or completely randomly! I like to mix it up and try a few different variations. You can even combine two or more stamps into one design. Allow the ink on the liner to dry before continuing.


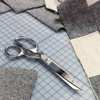
 Slip the freshly printed liner paper into an envelope, with the printed side facing out (see fig. 3). Fold down the top corners of the liner on both sides so that the folded edges run just below the glue line on the envelope. Remove the liner from the envelope, and cut off the corners along the creases (see fig. 4). You can also cut a rounded corner at the tip, to make it look even more professional.
 Insert the liner back into the envelope, and fold down the envelope flap. This will crease the liner at the fold (see fig.5). Lift up just the envelope flap, leaving the liner in place.
Slide a piece of scrap paper under the liner to protect the outside of the envelope from glue (see fig. 6), and use a glue stick to apply glue to the edge of the liner (note that it is only necessary to glue the liner’s flap). Close the envelope flap over the liner and press firmly to adhere the liner to the flap. Remove the scrap paper.
You now have a completed, lined envelope. Be careful when you seal the envelope, you don’t want to lick your stamped liner (or get a papercut on your tongue, ouch!)
Feeling inspired? Check out my other block printing DIY projects!
Ready to dive in to the world of printmaking? Check out my screenprinting class on Creativelive!


love it! 🙂
more posts like this! loving it!
I wish I were your pen pal